I firmly believe that food storage is just one aspect of being prepared for emergencies. And not the most important aspect. So I want to do a series on Emergency Preparedness. But I want it to be friendly to me, my family, and all of my readers.
True Story: Last February I made a 72 hour kit. The best and most complete I had ever made. Then in August I wanted to work on it some more, since I had learned a lot more about 72 hour kits during that 6-month time (like they should be 120 hour kits), and because some of the food needed to be rotated. I worked on my 120 hour kit a little bit during the last week of August. And..it's still not complete! I decided that I need a whole month to dedicate toward my 120 hour kit. Not just a few days.
I believe that some of my readers are this same way. (Not you of course!) People need time to work on something. The problem with a blog is that it has new information so quickly that it is impossible to keep up with everything. So each month in 2011 we will focus on a new emergency preparedness topic.
But I need your help! I don't profess to know everything, or to be able to build the "perfect" 120 hour kit. And I want this to be fun! So I need your input. Leave comments on each post introducing the topics. Email me pictures, questions, or comments about what you are doing and creating. The end of each month I will post pictures and stories from both my own ventures and yours on how we have become more prepared.
This will be fun! So invite your neighbors, friends, and family so that we can all "Be Prepared in 2011."
Topics
January: Evacuating Part 1 (Family Plan and 120 hour kits)
February: Evacuating Part 2 (Office and Car Kits)
March: Shelter-In-Place
April: Water Outage
May: Work Clothes and Tools
June: Emergency Cooking
July: First Aid
August: Prepare for Fire
September: Prepare for Earthquakes
October: Emergency Heating
November: Preparing for Financial Emergencies
December: Preparing for Other Natural Disasters
December 30, 2010
December 29, 2010
Red vs. White Wheat
When you go to buy hard wheat, you sometimes have a choice between red and white wheat. What does this mean, and what is the difference? A lot of people think there is a difference in nutritional value. This is not true. The only difference is that the gene(s) for color are taken out of the white wheat.
Wheat ground into flour looks like this:
You can see a slight difference in the color. (If I knew how to take better pictures, you would be able to tell a bigger difference.)
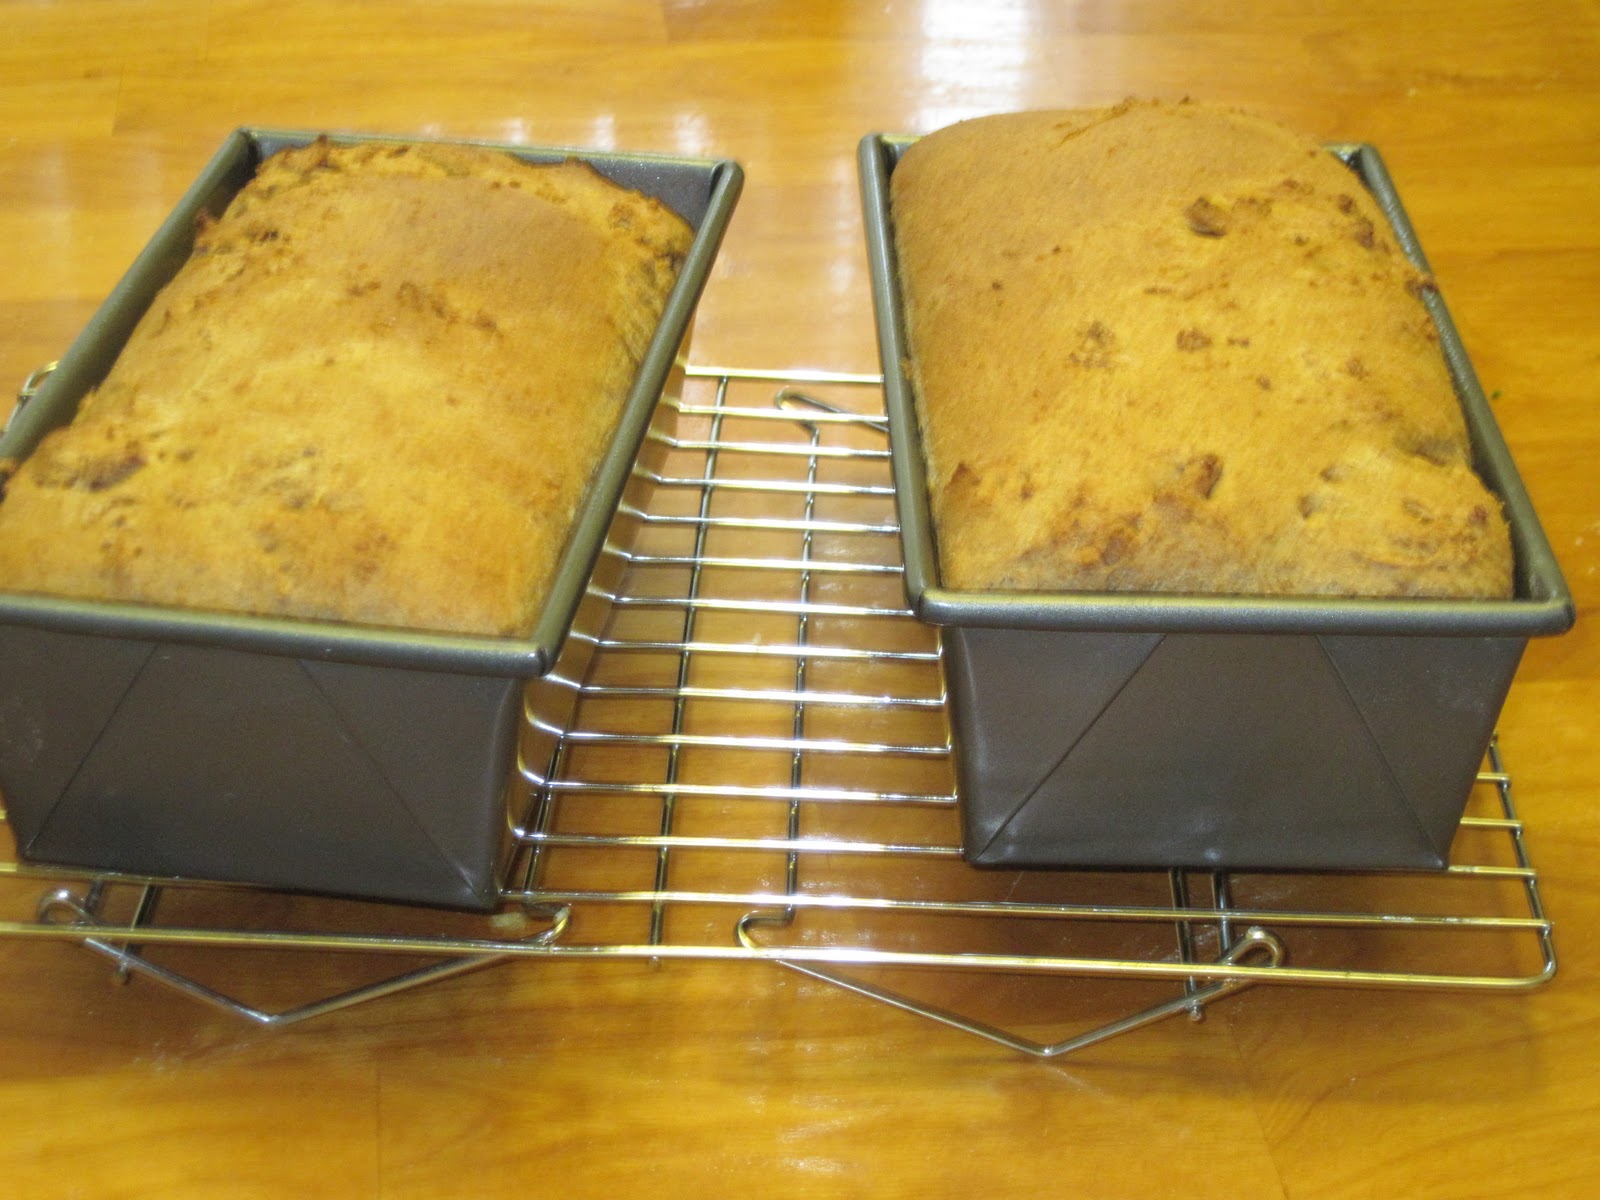
To test how the flours differ when cooking, I made my bread recipe using all white wheat flour in one batch, and all red wheat flour in a second batch.
To sum up the experiment, bread made with white wheat is lighter in color, and has a softer texture than bread made with red wheat. White wheat also rises a little higher. The bread made with red wheat was easier to slice. I typically make this same recipe using part red wheat and part white wheat with good results.
When I use wheat flour in every day recipes such as cookies, pizza dough, or pie crust, I like to use white wheat, because it is lighter in color and texture. It blends in with all-purpose flour better.
Coming Up: Gluten Free Cooking
 |
| red wheat (left) white wheat (right) |
Wheat ground into flour looks like this:
 | |
| red wheat (left), white wheat (right) |
To test how the flours differ when cooking, I made my bread recipe using all white wheat flour in one batch, and all red wheat flour in a second batch.
 | ||
| Bread made with red wheat |
 | ||
| bread made with white wheat |
 | ||
| red wheat (left), white wheat (right) |
When I use wheat flour in every day recipes such as cookies, pizza dough, or pie crust, I like to use white wheat, because it is lighter in color and texture. It blends in with all-purpose flour better.
Coming Up: Gluten Free Cooking
December 23, 2010
Storing Wheat Flour
Sorry, I know I said that I would post about red and white wheat next, but I forgot to talk about storing your wheat flour. A lot of people say that you have to store it in the fridge. Sure, this may be true if your kitchen is 100°, or if you plan to store your flour for 3 years. However, under normal conditions, don't worry about putting it in your fridge. I store mine in an airtight container, and have never had any problems.

By the way, last week when I made pizza, I put used 1/2 cup wheat flour, with 3 1/2 cups white flour. My husband turned up his nose when I saw a slight difference in color in the dough. But then he admitted that he couldn't taste any difference. Success! Next time I'll try a whole cup of wheat!
December 18, 2010
Wheat Berries
So you want to use wheat, but don't have a wheat grinder. You can make wheat berries! It is very simple to cook wheat. Here are a few methods:
Fast Stove-top Method: Heat 2 1/2 cups water and 1 cup wheat to boiling. Reduce heat to low. Cover and simmer 50-60 minutes. Makes about 3 cups of wheat berries.
Slow Stove-top Method: Heat 3 cups water and 1 cup wheat to boiling. Reduce heat to low. Cover and simmer 1/2 hour. Turn off heat and allow wheat to stand, covered 8-12 hours. Drain off any remaining liquid.
Thermos Method: Place 1 cup wheat and 2 1/2 cups boiling water in quart-sized thermos. Screw the top on lightly and leave until morning.
Slow Cooker Method: Place 3 cups water and 1 cup wheat in slow cooker. Cook on HIGH for 2-3 hours. Turn off slow cooker and let sit overnight.
So now what do you do with this wheat? I will admit that I don't use wheat berries a whole lot. I have eaten it as a breakfast cereal, warm, with milk and brown sugar or honey. I have put wheat berries in my meat loaf. That's my extent of wheat berries.
From what I read, though, you can use them in most any recipe to stretch the meat or other grain. Some ideas: use in chili, stroganof, noodle or rice salads, or stuffing.
Most important part: Introduce wheat into your diet slowly. If you do not, you will have severe pain. I believe this is the most important reason to introduce wheat into your diet now in slow amounts.
How do you cook wheat berries? Does anyone cook them in a pressure cooker? How do you eat them?
Coming Up: Red vs. White Wheat
December 17, 2010
More Reasons to Buy in Bulk.
In my Beginning Food Storage post I give a lot of reasons to store food. I've mentioned that I buy wheat in bulk. What I haven't written about, though, is why it can benefit to buy in bulk. I found this article listing a lot of reasons to buy in bulk. It lists reasons like less trash and transportation costs. Good article.
December 13, 2010
Using Wheat Flour
Back to wheat! The most common way to use wheat is as flour. If you are not accustomed to eating much wheat flour, you should begin by using it in small amounts in recipes you already like. For example, if you have a pancake or cookie recipe you really like, and it calls for 2 cups of flour, substitute 1/4 cup of the flour with wheat flour. As you become accustomed to wheat flour in your recipes, you can add a little more wheat flour.
It's easy and nutritious!
Coming Up: Cooking wheat kernels into berries. This is how you can use wheat if you don't have a grinder!
It's easy and nutritious!
Coming Up: Cooking wheat kernels into berries. This is how you can use wheat if you don't have a grinder!
December 8, 2010
Houston Gingerbread
This is probably my favorite Christmas goody.
Houston Gingerbread

Printable Version
Houston Gingerbread

Printable Version
2 cups flour
1 Tbs unsweetened cocoa
2 tsp baking soda
2 tsp ground cinnamon
1 1/2 tsp ground ginger
1/4 tsp ground nutmeg
1 cup sugar
1/2 cup butter, softened
2 eggs, separated
1 cup molasses
1 cup buttermilk
Old Fashioned Lemon Sauce, if desired
Whipped cream, if desired
Preheat oven to 375°. Grease and flour bottom and sides of 13x9x2 inch baking pan. Combine flour, cocoa, soda, cinnamon, ginger, and nutmeg in a bowl. Set aside. Cream butter and sugar together until light and fluffy. Add egg yolks, one at a time, followed by molasses. Add about 1/2 cup flour mixture, and mix well. Beat in about 1/4 cup buttermilk. Repeat three times, alternating 1/2 cup of flour mixture with 1/4 cup of buttermilk, and beat well after each addition. In a separate bowl, beat egg whites with an electric beater until stiff enough to stand in unwavering peaks when the beater is lifted from the bowl. With a rubber spatula, scoop the egg whites over the batter and fold them the eggs into the batter gently but thoroughly. Pour the batter into the prepared pan. Bake for about 25 minutes, or until a toothpick inserted in the center of the gingerbread comes out clean. Remove the gingerbread from the oven and let cool completely before cutting and serving. Serve with Old Fashioned Lemon Sauce and whipped cream.
Old Fashioned Lemon Sauce
1 cup sugar
1 egg, well beaten
3 Tbs lemon juice
1/2 cup butter
3/4 tsp grated lemon peel
Combine all ingredients in medium sauce pan. Heat to boil over medium heat, stirring constantly. Serve warm.
December 6, 2010
Coupon Event at Smith's
There is a coupon event going on at Smith's through tomorrow. All coupons valued at less than $1 will be rounded up to $1. So, if you coupon is for $.30, you'll get $1 off!
Check out GrocerySmarts to find out what you can get for free. Even if you don't get the newspaper, you can print off coupons to get several items for free or cheap.
Check out GrocerySmarts to find out what you can get for free. Even if you don't get the newspaper, you can print off coupons to get several items for free or cheap.
Mexican Bridal Cakes
Here's another one of my mother in-law's recipes. (I have to make my husband's favorite recipes, you know.) They're a little scary to make the first time. The dough will be crumbly. That's okay. You will have to work with the dough to make balls. That's okay. Just relax. They'll be good.

Mexican Bridal Cakes
Printable version
1 cup butter, softened
3/4 cup sugar
1 tsp vanilla
2 cups flour
1 cup pecans, very finely chopped (a food processor works well for this)
dash salt
2 cups powdered sugar
Mix all ingredients, except powdered sugar, together until mixed well and crumbly. Make tiny balls (about the size of a large marble) and place on ungreased cookie sheet. Bake in a preheated oven at 325° for 20 minutes, or until the bottoms of the cookies are light brown. Pour powdered sugar in gallon-size Ziploc bag, set aside. Transfer cooked cookies on cooling rack. When cookies are almost cool, place in bag with powdered sugar, a few at a time. Shake to cover cookies in powdered sugar.
December 3, 2010
Date Balls
'Tis the season for making lots of treats. So I'm going to post a few of my favorites over the next couple of weeks.
My mother-in-law makes these date balls every Christmas, and I just love them.

Date Balls
Printable Version
My mother-in-law makes these date balls every Christmas, and I just love them.

Date Balls
Printable Version
1/2 cup melted butter (cooled)
1 beaten egg
1/2 cup sugar
1/2 pound chopped dates (1 3/8 cup)
1 tsp vanilla
2 cups rice krispies
1/2 cup finely chopped pecans
grated coconut
Mix butter, egg, and sugar together in a small bowl. Pour into frying pan, along with dates, and heat for 10 minutes, stirring constantly. Remove from heat. Add vanilla, rice krispies, and nuts. Roll into small balls, with buttered hands, then roll in coconut.
December 2, 2010
Wheat Grinders
The most common way to use wheat is as flour. But in order to do so you need a wheat grinder. Wheat grinders are a little pricey but worth it. It is a lot more expensive to buy wheat flour than to buy wheat and grind it yourself, so the investment pays for itself quickly. And of course you want to use wheat flour, because it is a lot healthier than white flour. (More coming on that soon.)
I have two wheat grinders: a manual grinder, and an electric. I don't use the manual one very often, because it takes a long time, and manual labor, to grind the wheat. But I have it in case of emergencies. They cost less than $100, most around $60. I have seen them on sale for around $40.

I love my electric grinder, when I use it correctly. I have a Blendtec K-Tec Wheat Grinder. I bought it several years ago because a friend recommended it to me. She had one, and her mom had one that she used for 15 years before she had to get a new one. The other reason I chose this grinder is because of the price. I bought it for less than $200. Most electric wheat grinders cost closer to $300.
I made the comment that I love my grinder when I use it correctly. The reason I say that, is because I have not used it correctly two or three times, and I have had wheat flying around. One time I did not put the lid on all the way, and so the wheat was flying out instead of into the holding container.
Since buying this grinder, I have found this video, and this video that I would recommend watching if you would like more information on this wheat grinder.
Coming Up: Using wheat flour in your recipes.
I have two wheat grinders: a manual grinder, and an electric. I don't use the manual one very often, because it takes a long time, and manual labor, to grind the wheat. But I have it in case of emergencies. They cost less than $100, most around $60. I have seen them on sale for around $40.
I love my electric grinder, when I use it correctly. I have a Blendtec K-Tec Wheat Grinder. I bought it several years ago because a friend recommended it to me. She had one, and her mom had one that she used for 15 years before she had to get a new one. The other reason I chose this grinder is because of the price. I bought it for less than $200. Most electric wheat grinders cost closer to $300.
I made the comment that I love my grinder when I use it correctly. The reason I say that, is because I have not used it correctly two or three times, and I have had wheat flying around. One time I did not put the lid on all the way, and so the wheat was flying out instead of into the holding container.
Since buying this grinder, I have found this video, and this video that I would recommend watching if you would like more information on this wheat grinder.
Coming Up: Using wheat flour in your recipes.
November 27, 2010
Purchasing and Storing Wheat
You can purchase wheat from a variety of locations. I have purchased 45 pounds of wheat in buckets from a local grocery store (Macey's), and 25 pound bags and #10 cans of wheat from Home Storage Centers (LDS Canneries). When I buy the 25 lb. bags, I pour them into 5 gallon buckets with Gamma Lids attached.
I love Gamma Lids. They are air-tight, and easy to open and close, and install onto buckets. The usual price is around $8, but I have bought them several times on sale for less than $5. I have even seen them less than $4 a few times.


I love Gamma Lids. They are air-tight, and easy to open and close, and install onto buckets. The usual price is around $8, but I have bought them several times on sale for less than $5. I have even seen them less than $4 a few times.

November 24, 2010
Variety in Food Storage
I found this article about cooking from scratch. She gives a list if ingredients needed to cook different items from scratch. How you can start with flour, milk, salt, baking powder, and oil and make several recipes. When you add more ingredients, you can make more foods. The same thing applies with food storage. The more different ingredients you store, the more foods you'll be able to make. If you do have to live strictly off of your food storage, variety will be key. Therefore, store a variety of foods.
November 22, 2010
Emergency Car Kits
I have been asked to do a post about emergency car kits. This is especially important now as the weather grows cold, and there may be snow in your area.
You can keep your car kit in a backpack or duffel bag in your trunk. You may purchase a car kit, or you can create your own. It should include the following items:
You can keep your car kit in a backpack or duffel bag in your trunk. You may purchase a car kit, or you can create your own. It should include the following items:
- Jumper Cables
- Water
- Food
- Radio
- Flashlights
- Batteries
- First Aid Kit (including medications)
- Tools
- Kitty Litter (in winter)
- Shovel
- Blankets
- Emergency Candles
- Matches
- Extra set of clothes, boots
- Diapers (if you have a young child)
- Cloth in bright color (to attach to antenna if you are stranded)
- Money
 |
| My car kit. I also put a shovel and salt in the car before long trips. |
November 20, 2010
Nutritional Properties of Wheat
Wheat is so healthy! Eat some today (and tomorrow)!
Wheat is high in fiber, which will help you keep regular, and it contains a large number of vitamins and minerals.
Source: USDA
Wheat is high in fiber, which will help you keep regular, and it contains a large number of vitamins and minerals.
Source: USDA
¼ cup (30 g) | 1 cup (120 g) | |
Calories | 102 | 407 |
Protein | 4.11 g | 16.44 g |
Carbohydrate | 21.77 g | 87.08 g |
Dietary Fiber | 3.7 g | 14.6 g |
Sugars | 0.12 g | 0.49 g |
Total Fat | 0.56 g | 2.24 g |
Saturated Fat | 0.10 g | 0.39 g |
Trans Fat | N/A | N/A |
Cholesterol | 0 mg | 0 mg |
Iron | 1.16 mg | 4.66 mg |
Calcium | 10 mg | 41 mg |
Sodium | 2 mg | 6 mg |
Magnesium | 41 mg | 166 mg |
Potassium | 122 mg | 486 mg |
Vitamin A | 3 IU | 11 IU |
Vitamin A | 0 RAE | 0 RAE |
Vitamin C | 0 mg | 0 mg |
Vitamin E | 0.25 mg | 0.98 mg |
November 19, 2010
Pie Crust
Here we are less than a week before Thanksgiving, and I still haven't posted my favorite pie crust recipe. I got this recipe from a friend, and works out great every time. I have not had success with this recipe when the crust needs to be baked prior to adding the filling (such as for a cream pie). I like to use this recipe for baked pie crusts.
Pie Crust
Printable version
2 cups flour (I have used up to ½ cup wheat flour successfully)
1 tsp salt
1 cup butter (not margarine)
½ cup ice water
1 egg yolk, beaten and mixed with 1 Tbsp. water (if making something with a top crust)
Mix flour and salt together in a bowl. Cut the butter into the flour using two knives or a pastry blender, until the butter bits are the size of peas. Add ice water, starting with a few tablespoons and adding more as needed to moisten all the dough. (If you are using whole wheat flour, you may need to use a little extra water.) Stir with a fork until mixture forms a loose ball. Divide dough in half and make two equal patties. Roll one ball of dough out on a lightly floured surface into a large enough circle to fit in your pie plate. Place crust into pie plate and trim the edges with a knife. Roll out second pie crust in the same way. Place prepared filling into the pie and put top crust on. Trim edges and seal using your fingers to pinch, or a fork dipped in flour. Cut vents in top crust. Brush egg yolk over the top. If making a sweet pie, sprinkle with cinnamon and sugar, if desired. Bake according to pie recipe directions.
November 16, 2010
Beginning Wheat
When it comes to long-term food storage, wheat is king. Why? Because it stores well, is inexpensive, versatile, and nutritiousness.
Coming Up: Nutritional properties of wheat--Why you should eat wheat today (and tomorrow)
When stored properly, wheat can be stored for over 30 years. To last this long, it must be stored in #10 cans with an oxygen absorber, kept below 75°, and away from water, insects, and rodents.
However, you should not just let wheat sit on your shelf for 30 years. You should use it now. Why?
- Who wants to eat 30 year old food? Bluck!
- You should know how to use it before you have to use it.
- It's nutritious! Eat it every day!
- If you start eating a lot of wheat suddenly, you will get very sick. You need to build up your tolerance gradually.
Coming Up: Nutritional properties of wheat--Why you should eat wheat today (and tomorrow)
November 15, 2010
I'm Tired
I am tired of 3 month supply lists! I really don't want to create a new one, at least in a specified time frame. So I'm not going to. I will create it as I want to, and not how I should for purposes of this blog.
If you have never created a 3 month (or 1 month, or whatever), I would highly encourage you to do so. This is a good exercise, as it allows you to see what your family really eats, and what foods go into those meals. If you don't know how to create this chart, or have no clue what I'm talking about, visit my directions on how to do so: Step 1, Step 2, Step 3, and Examples. I will also keep my in-progress example in my left side-bar.
If you have any questions, just type it up in a comment, and I will address the issue.
Thank you for your patience!
Coming Up: Wheat!
November 12, 2010
Shopping Secrets

Another thing that I like about Grocery Smarts, is that it rates each item, using stars, telling you know how good of a sale it is. You can find stores in your state by clicking on your state in the drop down menu on the top left side of the main screen. There is a tutorial on how to use the site here.
Coupon Mom offers a similar service. It has some features, like sorting, that I really like.
November 5, 2010
Pumpkin
During these fall months I sometimes have leftover canned pumpkin. I'll make a treat, but not use the full can of pumpkin. One use I have found for this pumpkin is as an alternative for fat in cake. Last weekend I made Black Bottom Cake. Instead of using the 1/2 cup of oil, like the cake mix called for, I used 1/2 cup of pumpkin. Much healthier, and it gave a slight pumpkin flavor. I have not used pumpkin in other recipes in place of oil, but I'm sure it would work in a lot of baked goods.
Edited to add: I put 1/2 cup of pumpkin instead of oil in waffles, and it turned out great. Just make sure it gets stirred in well.
Edited to add: I put 1/2 cup of pumpkin instead of oil in waffles, and it turned out great. Just make sure it gets stirred in well.
November 4, 2010
3 Month Supply-Make Yours Now
If you haven't made a chart for your 3 month (or 2 week, or 6 month; however much you choose to store) supply, now's your chance! I'm making a new one, since I just made a new menu (I feel like I just made a new 3 month supply chart).
So, here is the start of my new 3 month supply chart. All I have done so far is write the meal across the top, and the ingredients required along the side. Then I fill in how much of that ingredient is required to make the meal. Ingredients that are only used in small quantities (like dry mustard) or that are staples (like flour) go in my ingredient list in the second tab.
So, here is the start of my new 3 month supply chart. All I have done so far is write the meal across the top, and the ingredients required along the side. Then I fill in how much of that ingredient is required to make the meal. Ingredients that are only used in small quantities (like dry mustard) or that are staples (like flour) go in my ingredient list in the second tab.
November 1, 2010
Black Bottom Cake
Black Bottom Cake
Printable Version
8 oz. package cream cheese, softened
1 egg
1/3 cup sugar
1/8 tsp salt
6 oz. chocolate chips
1 package chocolate cake mix
Combine cream cheese, egg, sugar, and salt together; mix until well blended. Mix in chocolate chips and set aside. Prepare cake mix according to package directions.
To make cupcakes: Fill paper cupcake liners 1/3 full with cake batter. Top with heaping teaspoons of cream cheese mixture. Bake 30-35 minute, in preheated 350° oven.
To make 9x13 cake: Pour cake batter into greased 9x13 pan. Dot the top with cream cheese mixture. Bake 40-50 minutes, or until toothpick inserted in cake is clean and cream cheese mixture is set, in preheated 350° oven.
October 28, 2010
My New Menu Plan
I have a new menu plan. While I like to cook and eat lots of different foods, my husband and children like the same few meals repeated frequently. So I gave in, and we are eating primarily their favorite meals.
Here is our 2 week menu:
Barbecue chicken with macaroni & cheese
Meat loaf with potatoes
Pizza
Spaghetti and meatballs
Chicken enchiladas
Beef enchiladas
Sweet & sour chicken
Stroganof
Chicken with white sauce and pasta or potatoes
Chili OR White Chili
Vegetable soup OR Tortilla Soup
Breakfast for dinner OR beef taco bake
We'll have these meals, with a few others of my choice mixed in, over and over again.
Pros of this menu method:
Con of this menu method:
How do you plan your menu?
Here is our 2 week menu:
Barbecue chicken with macaroni & cheese
Meat loaf with potatoes
Pizza
Spaghetti and meatballs
Chicken enchiladas
Beef enchiladas
Sweet & sour chicken
Stroganof
Chicken with white sauce and pasta or potatoes
Chili OR White Chili
Vegetable soup OR Tortilla Soup
Breakfast for dinner OR beef taco bake
We'll have these meals, with a few others of my choice mixed in, over and over again.
Pros of this menu method:
- It will be easy to decide what to have for dinner
- It's really easy to make a 3 month food storage plan (I will post it soon!)
- I can easily freeze meals ahead of time when I buy large quantities of meat
- My family will enjoy dinner all the time, since these are all meals we all enjoy
Con of this menu method:
- I will get a little bored cooking and eating the same foods
How do you plan your menu?
October 18, 2010
Powdered Eggs Experiment 1
I bought powdered eggs a few weeks ago for the first time, so my experiments are beginning. My first experiment was with cookies.
For this experiment I made 3 batches of cookies. The first was my control group, and was made with a regular egg. The second batch was made with 1 1/2 Tablespoons egg powder and 3Tablespoons of water, as I learned from Everyday Food Storage. The third batch was made according to the container's directions, with 2 1/2 Tablespoons of both egg powder and water.
Here were my observations of the dough:
Observations of the cookies:
My final thoughts:
For this experiment I made 3 batches of cookies. The first was my control group, and was made with a regular egg. The second batch was made with 1 1/2 Tablespoons egg powder and 3Tablespoons of water, as I learned from Everyday Food Storage. The third batch was made according to the container's directions, with 2 1/2 Tablespoons of both egg powder and water.
Here were my observations of the dough:
- The two batches made with powdered eggs were dry. The third batch (made according to the egg powder package directions) did not hold together completely.
- The two batches with egg powder tasted the same. Yes, egg powder is pasteurized, so it is safe to eat cookie dough!
Observations of the cookies:
- I thought all 3 batches tasted the same.
- Several people noticed that batches 2 and 3 had a slight different flavor than the first batch, but thought they were all good.
- Several people thought that batches 1 and 3 tasted just the same except 3 was a little more salty.
- One person thought the third batch was a little more moist, and one person thought it was a little dry.
My final thoughts:
- Why follow the package directions and use 2 1/2 tablespoons of egg powder when 1 1/2 tablespoons will do the trick?
- I will try using a little more water next time.
October 15, 2010
Canning, again
The past 2 days 2 friends and I canned 45 quarts of applesauce, and 32 quarts of grape juice.
Here's what I learned: Applesauce has multiple steps, but is easy! With a Victorio Strainer, you don't have to peel the apples or remove seeds. All you do is wash the apples, quarter them, remove the stem, heat on stove in a pot to soften, put through the strainer, fill the jars, and put filled jars in the boiling water bath.
Here's what I learned: Applesauce has multiple steps, but is easy! With a Victorio Strainer, you don't have to peel the apples or remove seeds. All you do is wash the apples, quarter them, remove the stem, heat on stove in a pot to soften, put through the strainer, fill the jars, and put filled jars in the boiling water bath.
October 13, 2010
Tip for Softening Butter and Margarine
Do you hate when you're cooking along, and you find that the recipe you're making calls for softened butter or margarine, and yours is in the fridge? Well, here's what you do:
- Put the cube in the microwave for about 5 seconds
- Turn the cube over, so that the side that was on the bottom is now facing up and cook for 5 seconds
- Turn the cube so that one of the sides is now on the bottom and cook for 5 seconds
- Repeat step 2
October 11, 2010
Canning
I'm posting about my canning experience last week only to give you a few ideas, if you have fruit readily available, and to give you a few tips so that you don't have to make the same mistakes that I do.
My friend and I made peach applesauce! The peaches growing in my backyard are not very flavorful, but they are sweet, so my sister gave me the idea to put them in with my applesauce. It was delicious, and I didn't have to add any extra sugar! Here was the problem, though: I didn't soften the fruit enough prior to putting it in through the strainer. When making applesauce, you're supposed to cook the apples (peeled and cored) on the stove just enough to soften them, then stick them through a strainer machine to get anything out that may have slipped in (such as a little peel, a seed, etc.). Because the fruit wasn't soft enough, it ended up shooting out quite a bit of good fruit with the little bit of stuff I don't want in my applesauce. I didn't realize that this was the problem until a day later, though, and ended up throwing away a lot of good fruit.
The next mistake was that the jars weren't warm enough before going into the boiling water. So one of the jars broke in the boiling water bath.
So there's my mistakes. I intend to not make the same mistakes next time, and I hope that you won't either.
October 8, 2010
Year Supply Chart
Someone asked me for a printable chart with recommended long-term storage needs. Here it is. Remember that you can adjust it to meet your and your family's needs. For example, f you have never eaten barley, don't store it. Store more oats instead. Just be sure to keep the totals.
October 5, 2010
Beginning Food Storage
Why Food Storage?
Why should I store food? Because you never know when you might not be able to get food at the store, and food is essential to your survival. There could be a trucking strike. You could lose your job. You could get sick and not want to leave home. A reverse quarantine could be put in place due to a wide-spread illness in your area. There could be a natural disaster (where you live, or where the food you eat is grown). The government could put rations on what you're allowed to buy at the store. I think you get the idea.
What should I store?
What do you eat? This is what you should store.
How do I rotate the food?
One method is to put new food in the back, and eat from the front. More details below under “How can I afford food storage?”
How can I afford food storage?
Here is my method:
1. First I determined an amount of money that I could afford to spend on food storage each month. This amount was higher than what I originally supposed, because I saved so much money on groceries.
2. The amount of money I budget for food storage revolves from month to month. So, if I don’t spend the money one month, I can spend it the next, or the following one after that.
3. Next I made a list of canned/packaged food that my family eats regularly, and estimated how many of each of these we eat in a 3-month time period. See all my 3 month supply posts.
4. When each of these items is on sale, I inventory how much I have, and how much more I need to complete my 3-month supply.
5. I purchase this amount of the item, plus enough to last until the next time I expect this item to go on sale (usually 6 months). For example, my family eats approximately 6 cans of refried beans in 3 months. When refried beans go on sale, I look in my cupboard, find that I only have 2 cans, and then buy 16 cans, because I don’t expect them to be this price for another 6 months (12 cans to last 6 months, plus 4 cans to make a 3 month supply). I pay for these 16 cans using money that I have saved up in my food storage fund.
6. When I have a good supply of food for my 3-month supply, and/or don’t expect any good sales at the grocery store soon, I go to the cannery to work on my year supply items (wheat, oats, etc.)
7. I use the food that I store for both my 3-month and year supply regularly, so that the food doesn’t go bad, so that I know how to use the food, and so that I save money on groceries.
October 4, 2010
Update on eggs at Maceys
I talked about the powdered eggs on sale at Maceys in this post. Turns out that the can has approximately 170 Tab in it (I opened up a can and measured), making large eggs about $1.12 per dozen. Not quite as good of a deal as I had hoped. But eggs are frequently more expensive than this, so I guess I may save money by using them sometimes.
September 28, 2010
3 Month Supply Examples
I am finally getting around to posting my 3 month supply examples. Sorry it has taken me so long.
One method for developing a 3 month supply is to use what I call the pantry method. What's in your cupboard, fridge and freezer? Store more of that. Examples can be seen here, and here.
You can find a wonderful example of the very organized approach (what I explain in my 3 month supply posts) here (under Helpful Tools).
I do a combination of the two methods. Here is my example. Sheet 1 is the Very Organized Approach (it's organized to me--I hope it makes sense to you), and Sheet 2 is the Pantry Method. Please keep in mind that this is my worksheet and it changes regularly. I only make changes on what I have and need when there is a great sale on the item and I plan to purchase some. No, my family does not only eat meals with cheese. The list of meals is just an example of some of my family's favorites. This list provides ingredients that my family uses the most, allowing me to usually have more than enough for me to make any meal I choose.
September 25, 2010
Great Deals At Maceys
Update in this post.
If you live in Utah, check out the deals at Maceys. Click here. The deals mentioned below are good through October 5 (I'll update that date if I find out otherwise).
Dried whole eggs are $11.98 per #10 can. 1 Tab is the equivalent of a medium egg. 2 Tab is an extra large egg. So, there are about 236 medium eggs in the container. That equates to about 61 cents per dozen medium eggs.
Morning Moos Milk Alternative (which is not real milk, but does contain milk ingredients, and it tastes good) is on sale for $8.88. This equates to $1.58/ gallon. Remember, though, it is not real milk. (I'm sure I'll post about this later.)
There are also great deals on 50 lb bags of flour, and 45 lb buckets of wheat, along with many other items.
Case Lot Sale runs from September 29-October 12. This is usually a great time to stock up.
September 23, 2010
Homemade Liquid Laundry Soap
When I was making this the first time (just a few weeks ago) I hated it after letting it sit overnight. It was so thick and clumpy. I thought that I would never use it again. After stirring it well, to break up all the large clumps that had formed, I poured some into an old laundry soap bottle. I shake it every time before using it, and have never had any problems. In fact, it cleans the clothes well, I use it as a stain remover (just scrub some soap into the stain with an old tooth brush), and it makes the clothes soft, as if I used a fabric softener (something I never do). The best part is, that it costs less than $3 to make 5 gallons! 5 gallons would wash about 320 loads in a high efficiency washer, or 128 loads in a regular washer. It is also easy to store a year supply of laundry soap this way. It would fit in a shoe box. You can find the ingredients for this at most any grocery store. Just look on the aisle with laundry soap and stain removers. Wal-Mart does not sell Fels-Naptha.
Grate bar of soap and add to water in saucepan. Stir constantly over medium-low heat until soap dissolves and is melted. Fill a five-gallon bucket half full of VERY hot tap water. Add melted soap, washing soda and Borax. Stir well until all powder is dissolved. Fill bucket to top with more hot water. Stir, cover, and let sit overnight to thicken. Stir well 6-12 hours after allowing to sit. (This step is very important.) You can add 10-15 drops of essential oil per two gallons, once soap has cooled. Use 5/8 cup per load for top loading machine. ¼ cup for front loading or high efficiency.
Homemade Laundry Soap
4 cups hot tap water
1 Fels-Naptha soap bar
1 cup Arm & Hammer Super Washing Soda
1 cup 20-Mule Team Borax Natural Laundry Booster
September 20, 2010
Last Day of Challenges
If you haven't been to Food Storage Made Easy this week, I would encourage you to. Every day there has been a new challenge. I have done little, if anything, on each of the challenges, but it has got me thinking. Today's challenge is to clean up and organize your food storage. I definitely need to do this one, but I don't know if I'll get to it today. I am hoping to dehydrate more apples, and I'd like to make apple butter. We'll see if I get to that.
September 18, 2010
Vegetable Spaghetti
Last night I cooked a delicious garden vegetable meal. This is the only part of yesterday's challenge that I succeeded in. Today's challenge I'm just not even going to try. But how do you cook in doors without electricity or gas? Barbecue and dutch oven just don't work.
Here's what I made for dinner last night:
Vegetable Spaghetti
3 medium tomatoes, diced
2 cloves garlic, minced
3 cups sliced vegetables of your choice (onions, zucchini, eggplant, peas, carrots, broccoli, peppers, etc.)
1/2 tsp salt
1 tsp basil
1/4 tsp pepper
Spaghetti
Parmesan cheese
Cook heartier vegetables (such as onions, zucchini, eggplant, etc.) and garlic until crisp tender in a little oil. Add tomatoes, peas, and seasonings until warm. Serve over cooked spaghetti noodles, and top with Parmesan cheese.
September 17, 2010
Today's Challenge--I Really Think I Can and Should Do This One!
Yesterday's Challenge from Food Storage Made Easy was a complete flop for me. I just didn't do it!
Today's challenge, though, I think I can, and should do. The idea is that a family of 6 is coming to live with me for a few days. So I need to cook for them, and provide them with somewhere to sleep. So today I get to make extra food and freeze it. I also get to prepare for my sister's family to visit next week.
Today's challenge, though, I think I can, and should do. The idea is that a family of 6 is coming to live with me for a few days. So I need to cook for them, and provide them with somewhere to sleep. So today I get to make extra food and freeze it. I also get to prepare for my sister's family to visit next week.
September 16, 2010
Dehydrating
The past couple of weeks I have been dehydrating apples and onions. The apples are so good to eat just as a snack, and I think I will also try re-hydrating them to use in baked goods. I have used an apple corer-peeler-cutter machine. That has made it really fast and easy.

The onion experiment did not go as well. It took forever to cut and separate the onion onto the dehydrator. And then I ended up with only a small amount of dehydrated onions to show for my labor. I think that I will buy some dehydrated onions from the LDS Cannery.


The onion experiment did not go as well. It took forever to cut and separate the onion onto the dehydrator. And then I ended up with only a small amount of dehydrated onions to show for my labor. I think that I will buy some dehydrated onions from the LDS Cannery.


Another Challenge
I failed yesterday's challenge of cooking everything from scratch. I was feeling under the weather, and so I did not make bread, or dinner. We ordered pizza. Very much against the rules.
Today I'm canning plums, so I already know that I will fail today's task of no electricity or water. I am also supposed to not drive at all (I think I may do that part), and I should also take my 120 hour kit, all my valuables, and my family and go to my family's meeting place for 2 hours. I don't think I'll do that. Probably should, though. It would be a good exercise. How can I get 2 kids (2 and under), the computer, financial binder, money, safe, and 120 hour kit (in a rolling suitcase) to the park? I need to work on that one.
Today I'm canning plums, so I already know that I will fail today's task of no electricity or water. I am also supposed to not drive at all (I think I may do that part), and I should also take my 120 hour kit, all my valuables, and my family and go to my family's meeting place for 2 hours. I don't think I'll do that. Probably should, though. It would be a good exercise. How can I get 2 kids (2 and under), the computer, financial binder, money, safe, and 120 hour kit (in a rolling suitcase) to the park? I need to work on that one.
September 15, 2010
Challenge Day 2
Well, I completely failed yesterday's challenge of not using water from the tap. Thinking about the toilet was as far as I got. I put a plastic quart-sized milk jug filled with rocks and dirt into the back of the toilet so that it required less water. Does anyone have any ideas of things to put in the back of a toilet to conserve water? My toilet still requires about a gallon of water to refill it! My husband said if we really couldn't use water inside our home we would build sometime of "bathroom" in the garden. More like a tarp being held up by something. And we would fertilize the garden. Yuck!
Well here is today's challenge: cook everything from scratch. This is more my style. I think I can do this one. I've already made oatmeal. I just put oats, water, powdered milk, nutmeg, cinnamon, and raisins in a bowl, and stick it in the microwave.
Well here is today's challenge: cook everything from scratch. This is more my style. I think I can do this one. I've already made oatmeal. I just put oats, water, powdered milk, nutmeg, cinnamon, and raisins in a bowl, and stick it in the microwave.
Subscribe to:
Posts (Atom)